The Sirena Expedition, Postmortem, Part 2

In the previous post, I talked a little about The Sirena Expedition’s origins as a Jam game. I’d like to talk more about that genesis, how I got from there to a Steam release, and what the response to the game has been. I’m going to try to not be too negative about things, as I’ve been lucky in some areas and there are definitely games on Steam that have got way less attention, but simply put it didn’t sell as much as I needed to in order to comfortably continue making games independently.

2021

The Sirena Expedition was not the game I intended to make when I left my previous job and went independent. At the time I was working on a platformer for the then-unreleased Playdate console. However, I didn’t have pre-release access to hardware or the SDK, so I was prototyping it in Love2D, which I figured would be easy enough to port to Playdate. Eventually I reached a point where I felt like progressing would be pointless, because I’d be building systems that would likely already be covered by the Playdate SDK.

Playdate Prototype.

It was around this time that I learned that the Haunted PS1 Summer of Shivers game jam was about to start. I’d recently been playing a lot of PS1 games, so I felt like I had a good handle on the aesthetic, and the idea of going back to Unreal Engine 4 appealed to me. Of the two available themes, I picked ‘Submechanophobia’ (fear of underwater human-made objects), and gave myself the following brief.

  • A 2.5D platformer, in the style of Pandemonium and Klonoa, set in a mysterious facility at the bottom of the ocean.

  • Fairly strict adherence to PS1 aesthetics in terms of polygon count and texture size, and emulate the visual quirks of the system, but allow UE4 to handle the lighting.

  • A relaxed game with no enemies and no fail state, with fully voiced dialogue.

To me this felt like it would stand out from the majority of PS1 horror games at the time, as not many people were making 2.5D platformers, and certainly not as horror games. I finished the game within the 2 month limit, and I’ve written a postmortem of that development before. The jam ended on the 1st of September 2021, and I spent a few weeks watching playthroughs of the game on YouTube and making changes/fixing bugs based on what I was seeing. This was around the time I decided to make a full game out of it, as I’d got quite a few eyes on the game as part of the coverage that the game jam received and the response was very positive. Rather than start a new project from scratch without knowing whether it would appeal to anyone or not, or go back to the Playdate project, which I still didn’t have a way of moving forward with (I wouldn’t get my Playdate until April of 2022), this seemed like a sensible direction to go in.

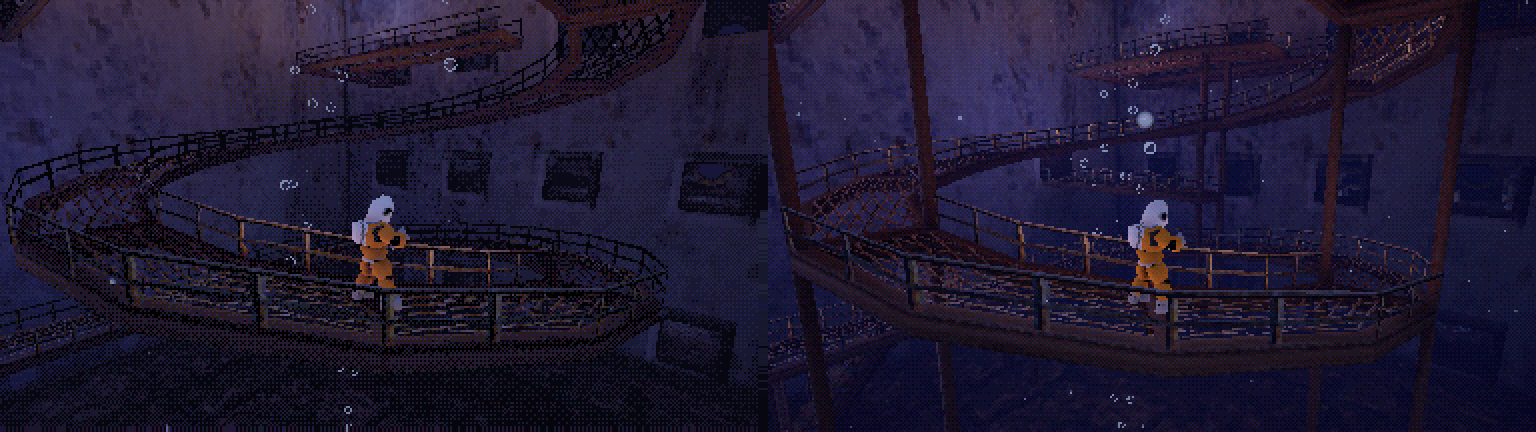
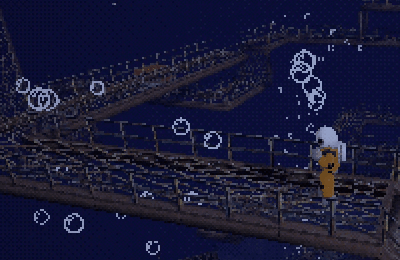
Did that momentum carry over to the release, over two years later, in October 2023? Kind of. Selling myself is not something I’m particularly good at, so marketing a game was always going to be a bit of struggle. Knowing that, a game that spoke loudly for itself in images and videos was always going to be my best shot. I think The Sirena Expedition was that game. The visuals and atmosphere are always what people say stands out the most about it. Considering I have less experience with graphics than most other areas of game development, this is about the best outcome I could have hoped for.

Atmosphere.

2022

Going back to the start of 2022, I had by this point finished work on features I’d need for the final game, such as subtitles, a proper options menu and a debug menu for skipping to different parts of the game. While I was working on implementing new mechanics for the final game (ladders, and pushable blocks), I started to pull a demo together, along with a teaser trailer. Having made the game for the Haunted PS1 community, my plan was to submit the demo to 2022’s HPS1 Demo Disc, and get eyes on the game that way. This didn’t quite work out, though, and I narrowly missed out on getting The Sirena Expedition on the collection.

With this door closed, Steam Next Fest was my best option to get a bit of pre-launch hype. I’d initially planned to enter the demo into the June Next Fest, but missed the deadline, so I ended up going with the October Next Fest. This ended up working in my favour, given that I wouldn’t release the game for another year. I polished the demo I’d already made and set about putting it on Steam. This was actually pretty straightforward, once I’d realised that the build upload method Valve recommends in their documentation is way more complicated than it needs to be, and there is just a simple GUI-based application that does all of the hard work for you.

Next Fest ended up being a real boon, for someone who didn’t have an existing platform or much in the way of recognition for the game I was making (by this point coverage of the Jam version of the game had died down, obviously, and not many people knew I was working on a full version). As it was, the event itself did a good job of putting the game in front of people, and combined with people covering it on YouTube and Twitch got me a decent number of wishlists, which is really the best indicator you have for how well your launch is likely to go. If you’re releasing a game on Steam, Next Fest is pretty much essential at this point.

Playtesting

Around the same time, I was finishing up the main design of the game and had it pretty much playable from start to finish. I was very curious if the teleportation mechanics, which I’d implemented a couple of months earlier, made sense to players, and whether the puzzles I’d built were understandable. It was time to do some playtesting. I reached out on Facebook looking for testers, and ended up with about ten people. Having the game already set up on Steam made playtesting a simple process; all I had to do was give the testers beta keys, and upload a new build before each session.

The sessions were incredibly useful, and helped me identify and fix a number of things that didn’t make sense, along with a few bugs that I’d missed just because I’d got into a groove of playing the game a certain way, and it took people who weren’t me to highlight them. By the last couple of testers, everything felt pretty smooth, and having finalised the layout of the platforming in the new areas, I was happy to move on with building the environments for them.

2023

Development continued into 2023, with not a whole lot to report except that it was taking longer than I’d expected. As I started to wrap up the main game, I made a start on the second playthrough, and it became obvious that I’d seriously underestimated the amount of work it would take to make it a worthwhile addition to the game. The bulk of this was animation work; after I copied all of the Aquanaut’s animations over to the new character’s skeleton, I first had to spend a long time cleaning up keyframes, and secondly I had to alter each animation so that it fit a character that had very different proportions.

When I realised that it was going to take me until the latter half of the year to get the game anywhere near a state where I could release it, I set the Steam Halloween sale as my target release date. As with Next Fest, an event seemed like the best way to get the game in front of people, and since I was planning on a launch discount anyway, this felt like my best option. All I had to do was finish the game before the 26th of October. Did I manage this?

Key art for the Steam Halloween sale announcement.

Not really! I mean, I released the game on time, but it wasn’t what I’d call finished. For a start, I’d planned to rework all of the puzzles in the second playthrough to make it a distinct, harder challenge than the main game; unfortunately I only managed to redo the first two puzzles, after which the gameplay was identical to the main game. It would be a month after the initial release by the time I got the new puzzles in, and while not that many people knew how to unlock the second playthrough in this period, I didn’t quite get away with it. It galls me that one of the top results when you search for the game on YouTube is a video uploaded by the first person (that I know of) to unlock the second playthrough, and it shows the unfinished version with the same puzzles as the main game.

Also missing from the initial release were achievements (which I added a month later, around the same time as the final puzzles), and a number of pieces of music, which took until February of 2024 to finish. I don’t feel great about having released The Sirena Expedition without all of these things, and while they’re in there now and I consider the game finished, a lot of the early adopters - the people who were most excited about playing it - had an experience that was markedly worse than those who picked it up a few months later. As a solo developer with a tiny budget and no marketing department though, it felt like my hands were tied; I’m fairly confident that had I launched the game outside of the Steam Halloween sale, it would have sold even less than it did.

Reception

I’ve been keeping a fairly close eye on playthroughs of The Sirena Expedition on YouTube and Twitch.tv since release, both to see what players make of the game and to discover issues that they might be having so I can fix them. I’d like to highlight a couple of the playthroughs, and then mention a few other videos that covered the game.

Elajjaz reacting to the ‘helmet reveal’.

By far the largest streamer to play the game was Elajjaz, who has ~480,000 followers on Twitch. The VOD is no longer available on Twitch, but while it was up it had about 140,000 views; the archived version on YouTube currently has about 1,600 views. For a lot of games, this kind of coverage would be the thing that makes them, but it barely registered as a blip for The Sirena Expedition; I would attribute about 7-8 sales to Elajjaz’s video.

I think this is down to the fact that it’s a short, linear-ish narrative experience, so when people see someone play through it, there’s little incentive for them to buy the game, outside of supporting the developer. Also, while Ela was very much positive about the game and seemed to enjoy his time with it, his audience, who seemed to be mostly younger guys who communicate in Pepe emojis, were broadly critical of it. It feels safe to say that they’re not really the game’s target audience, and the numbers seem to reflect this.

Nemure_In_Peace reacting to the second ‘helmet reveal’.

In contrast, Nemure_In_Peace is a YouTuber with a considerably smaller following (24,500 followers). She streamed two videos where she played through the game, found the secret codes, and then completed the second playthrough, which currently have 1,600 and 1,000 views respectively. I would say I got about 8-10 sales as a result of these videos; while not massive, it’s a much larger proportion of viewers than with Elajjaz’s stream. Nemure’s audience were a lot more engaged with the game, as was Nemure herself, and they were more open to the slightly quirky nature of the secret content.

Two final videos I wanted to highlight:

  • Prezmer’s video, The Many Faces of Underwater Horror Games. This is a video which looks at six different underwater games, including The Sirena Expedition, and examines what it is about the ocean that terrifies us. One of the games, Beyond Blue, isn’t even a horror game, so part of the video’s thesis is about how the very nature of being underwater is inherently unsettling and terrifying. Prezmer is very positive about The Sirena Expedition’s atmosphere, highlighting it as what keeps the game unsettling in the latter half when the game’s focus shifts away from the horror elements.

  • Uyutnyy Podval'chik’s video, Oni khotyat byt' Resident Evil i Silent Hill s PS1 (They want to be Resident Evil and Silent Hill from PS1). This video is entirely in Russian, so I’ve had to rely on YouTube’s automatic captions and Google Translate. As a result, I may have misunderstood some of his points. From what I can tell, though, he’s generally a bit down on the game. He does say that it looks much more authentically like a PS1 game than the other games he covers (all of which were also made for the Haunted PS1 Summer of Shivers game jam). However, he takes issue with the price and the length, talking for a long time about how 400 rubles (around £3.50) is too much for a game that only takes 50 minutes to complete, and that he felt like he’d been misled about the length of the game. As one of the commenters pointed out, though, the game costs 240 rubles (around £2) on Steam. Also, the game’s Steam page states unequivocally that it takes about an hour to complete. I don’t think this video did me any favours really, because despite it having 52,000 views, The Sirena Expedition has so far only sold 29 copies in Russia.

Commercial Value

The second of these videos leads into discussion of the game’s price and length, and has caused me to think a lot about how people tend to value a creative work differently. As someone who has made games and knows how much effort goes into making one, I know I’m probably in a minority here, but I don’t think there should be any connection between a game’s price and the length of time it takes to finish it. I understand where the desire to do so comes from; if I can play an hour-long Game Jam game for free, why pay £5 for a similar title? Or, if I can pick up something like Civilization VI for £5 in a sale, or get Among Us or Vampire Survivors for £4 at full price, games with basically-endless replayability, why pay the same amount for a game you’ll be finished with in an hour?

I understand it, but I still believe it’s a depressingly reductive way to think about games. It feels like sentiment dredged up from a ‘90s video games magazine review, a mark out of 10 for ‘Replayability’ that ascribes positive value to an increasing number of hours a game demands of the player, and negative value to a game that respects the player’s time and doesn’t outstay its welcome. No doubt it’s because I’m at a point in my life where my time is my most valuable asset, and a game that demands less of it from me is a much more appealing prospect than one that expects me to put aside 50-100 hours.

I mean, I get it. Who am I to say what £5 means to someone else? It has been interesting to look at Steam’s automatic pricing suggestions for other countries. The US and UK pricing are roughly equivalent after currency conversion, but in a lot of non-Western countries, the suggested price comes out at around £2.80. And as previously mentioned, the price in Russia equates to less than half the price I originally set for it. Steam clearly does this for a reason, but it’s not entirely clear what that reason is. Interestingly, most of the complaints about the game’s price that I’ve seen have been from Russian people.

Numbers

To wrap up, then, let’s talk sales figures. Here’s Steam’s graph of sales over time since the game’s launch, with the four sale periods and the discount amount highlighted:

Sales figures on Steam.

The opening week is clearly the biggest sales spike. At this point the game had been wishlisted about 2,800 times, and sold 491 copies. This wasn’t enough to push it into the New & Trending list on Steam’s front page, so all attention at this point came from the Steam Scream Event page. Between the end of this week and the start of the Winter Sale in December, the sales obviously dropped off quite a lot, but still averaged about 5 per day. At this point there was still buzz from people playing the game on Twitch and YouTube.

The game then sold 207 copies in the Steam Winter Sale, a 2-week event. Much fewer sales per day than the launch week, obviously, and the momentum then dropped off considerably for the start of 2022. I put the game on sale at the end of February, to mark it finally being finished, and during this week it sold 172 copies. The most recent sale has been Steam’s Lovecraftian Days sale, during which I managed to get a bit of traction from a retweet by @horrorvisuals on Twitter. As a result, it sold 220 copies this time. At this point, however, the game is averaging less than one sale per day outside of sales events.

Wishlists on Steam since the game’s Steam page went live.

The Sirena Expedition has been wishlisted 6,284 times, at time of writing. As you can see above, the biggest spike in wishlists happened during launch week, presumably from people who were interested in the game, but wanted to wait for a slightly higher discount than 20%. There are a couple of other spikes that are worth talking about, though. The first one, in October 2022 is from Next Fest. The next noticeable spike before launch happened at the start of August 2023, and I’m honestly not sure what caused it. I can see that the game’s Steam page got a whole load of visitors in that time, but I can’t find anything on Twitter, YouTube or Google that would explain it.

Post launch, there was a fairly steady increase in wishlists, but the first two major sales actually decrease the wishlist total, because the number of people buying it from their wishlists outpaces the number of new wishlist additions. The one exception to this is the most recent sale, but this is because of the attention that came from the HorrorVisuals retweet.

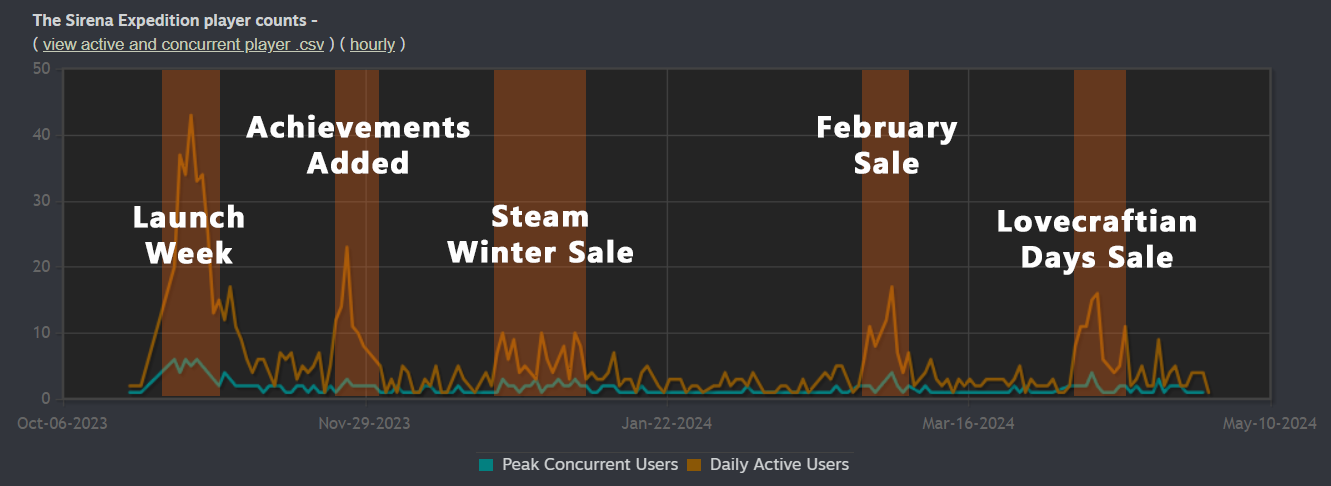
Daily active users on Steam.

Lastly, here’s a graph of player counts over the game’s lifespan. Not much new here, aside from the spike in players after I added achievements to the game. I think a number of these will have been people loading the game up to retroactively get achievements after having finished the game already. Also, despite there not being a lot of sales in the last couple of weeks, there have been more players than usual since the Lovecraftian sale. Not sure why that is!

Anyway, I think that’s about as much as I want to say about the game for now. Thanks for reading all the way to the end, and feel free to reach out if you have any questions about anything!

The Sirena Expedition, Postmortem, Part 1

EDIT: This blog post was featured on GameDeveloper.com on the 18th of April 2024.

It’s been almost six months since the release of The Sirena Expedition, and I’ve been meaning to write a post mortem of the project for a while now. I’d like to talk a bit about the development of the game, and look at some of what I thought went well, along with what didn’t go quite so well. In this post I want to focus on the design of the game itself, and in a second post I’ll look more at the decisions I made around the game; what drove me to make it, how I got it to release, that kind of thing. I’ll try to limit spoilers as much as possible, but I built the game with a couple of main surprises in mind, and talking about game’s design in detail will necessarily spoil these a little. I do recommend playing the game before reading this, if you can.

The Beginning

Comparison between the Game Jam build (left) and release build (right).

For those not aware, The Sirena Expedition started life as a game jam entry, which I initially made in a little over two months. As the response to this prototype was positive, with coverage from Alpha Beta Gamer and a couple of Twitter accounts that cover horror/PS1 games, I decided to flesh the game out into a full, commercial title. I’m getting ahead of myself a little, but I do wonder if this might be the reason for what I perceive as the game’s design failings. I tend to design games with an entire experience in mind, and the game jam build is this; a 2.5D platformer in the style of Pandemonium, but largely narrative-focused and mechanics-light.

However, when envisioning what a commercial version of the game would be like, it felt to me like I needed to lean more into puzzle mechanics. Partly this was a practical decision; I was aiming to make the game about an hour long, and if it had been a straight ‘walking simulator’ with no real pushback on the player’s progress, the amount of new content I’d need to make felt unrealistic to me. As a result, however, the game feels a little less cohesive than it would if I’d designed it from the ground up with its central teleportation mechanic in mind.

I think I was fairly successful in mitigating this by tying the teleportation skill to a major plot turning point in the game, and generally when I’ve watched videos of people playing it, their reaction is everything I could have hoped for; shock at the aquanaut removing their helmet, followed by surprise that they can now swap places with the blocks they’ve been pushing around. To make this work, I had to mislead the player a little about what the game is in the marketing, by referencing the teleportation as little as possible (there’s some blink-and-you’ll-miss-it footage of it in the trailer, but nothing else). In general I’m glad I did this, but of course there are people who are unhappy that the game isn’t quite what they were initially sold on.

Teleportation

Swapping places with a block.

I think there are a couple of other places where this lack of cohesion is visible, though, which are a bit more problematic. For one, when I started working on the full version, I knew I needed some kind of extra mechanical hook, but I didn’t know what it would be. I had an outline for the narrative flow of the entire game, and this included the player gaining a new ability in order to progress in an area they’d been through at the start of the game, but which was now collapsed and impassable. However, for a few months I didn’t know what this ability would be, and I ended up making quite a lot of the rest of the game before finalising it.

I thought about some kind of air-dash or double jump, but these felt at odds with the rest of the mechanics, and also a little obvious/underwhelming. Teleportation felt like the best fit, and something I could justify narratively, but how to make it something that could be used in puzzles? Allowing the player to teleport freely would have been too hard to implement mechanically, and too difficult to constrain in a way that would allow for interesting puzzle design. Similarly, having fixed points for the player to teleport to or from didn’t seem very interesting, just a case of ‘press a button to go to the next area’.

So, having just added pushable blocks to the game, it felt like allowing the player to swap places with them was my best option. I’m definitely happy with how I implemented the controls for selecting a target to teleport to; it’s easy to learn, feels (mostly) intuitive, and works both with an analogue stick and with arrow keys or WASD (mostly). Outside of that, though, there are things I had to do to make the puzzles work that feel weird and arbitrary, and which could have been avoided if I’d designed the game around the teleportation mechanic from the start.

Limitations of the Teleportation Mechanic

Visualisation of how the teleportation mechanics select a target.

The teleportation mechanic works by having the player hold a button down and push in a direction. This direction is translated into screen space, and I draw an imaginary box from the player’s location to the edge of the screen and find which blocks are inside that area. If there’s more than one block, I do a bit of maths to determine which one the player was most likely pointing at, and make that the current target. When the player releases the button they swap places with this block. Once I’d got all this working and had started designing puzzles around it, a couple of problem points became apparent:

  • Because of the spline-based nature of the game (you’re essentially moving on a 2D plane, but it bends around corners and splits into different paths), you often have a view of blocks in earlier parts of the level. If you select one of these as your teleport target, you can swap places with it, and you generally end up unable to progress (because the block you swapped places with was needed for progression, and it is now off-screen and you can’t teleport back to it). There is also the fact that block selection doesn’t care whether a target is obscured by geometry or not. As such, you could technically teleport to a block that is completely obscured by a wall, or in one case, outside of the facility when you are inside of it.

  • It is possible to swap places with a block, and then be unable to see it in order to swap back, due to the fact that the camera rarely looks at the player straight on, but is generally tilted down a little. So, you might be able to see a block that is below you, and teleport to it, but now because the camera is tilted down you can’t see the platform you came from, so you have no way of getting back up there. Basically, every teleport you make needs to be reversible, and that can’t always be guaranteed.

The fix for the first of these issues was to introduce a limit to the distance that you can teleport, and put volumes in the game that change this distance. So, if I discovered that in one of the rooms it was possible to teleport to a block outside the facility, and the closest you could get to that block was about 3,000 units, then I’d set the teleport distance to 2,500 units while you’re in that room. It made designing puzzles a laborious affair, as I had to consider every possible way the player might be able to get stuck. In the end, controlling the teleport distance isn’t a solution that I’m particularly happy with, but it’s the only one I could implement within the game I made. From the player’s perspective, the fact that the distance they can teleport isn’t consistent must be frustrating, as it can lead to situations where you feel like you should be able to teleport to a block (because you could teleport that distance earlier in the game), but you arbitrarily can’t this time. And if you take a couple of steps towards it, suddenly you can. I’m not happy with this.

The distance the player can teleport can feel arbitrary.

The fix for the second of the two issues mentioned above was basically to make sure that the camera angle always allows the player to teleport to things they need to teleport to, which again was labour-intensive. As with most things in the game, I used invisible volumes to change the camera settings, so I simply had to look for all the possible ways to teleport somewhere that left me stuck, and then change the camera settings accordingly. Again, this is not ideal, and there’s no way of being sure I’d caught all of the edge cases.

The way I see it, if I’d designed the game with the teleportation mechanic in mind from the start, it would be entirely 2D instead of 2.5D, and most likely room-based. This way, the relevant blocks are always on-screen, and you can always teleport back to them. I think it would have given me a lot more freedom to explore the mechanics and find the most interesting puzzles, as opposed to trying to figure out what fits within the constraints of the facility that I had already largely made.

An overview of the Rooftop Platforming section.

The one exception to this is the large, abstract platforming section on the roof, where I basically had free reign to design the puzzles however I wanted. Even this ended up feeling a bit under-baked though; there are three blocks that you need to bring to one location to reach a switch, and one of them requires solving a moderately interesting puzzle, while the other two mostly just require you to push or drag them, and occasionally teleport them. I did get to revisit this area in a secret mode and created a few more substantial puzzles, but most players won’t see them, and I think those that do are a little tired of the mechanics by that point. So my general feeling is that the puzzles needed a lot more iteration and testing to make them something you could build a game around, and the way I developed the game didn’t really allow for that.

Some Positivity

To counter what has largely been negativity about the design so far, I do want to cover some of the things that I think I did well. The main strength that gets mentioned is the game’s atmosphere, which I worked hard on, and which I believe does a good job of carrying it even when the horror elements start to fall a little flat. A lot of this is because I was less interested in making a straight horror game than I was in making a game that makes you feel like you’re at the bottom of the ocean, in a place that feels strange and unknowable. A lot of the heavy lifting is done by the PS1-style visuals, evoking an era that is by this point something of a cliché in horror games, but which I believe still holds a lot of potential when done well. I can’t take credit for all of this, as the shaders I used for dithering and texture/vertex wobble were made by Jazz Mickle and Lilith Walther respectively, but I’m really happy with how my environment and character models feel authentic even while the lighting model doesn’t. Sound also plays a big part in carrying the atmosphere, and a lot of effort went into getting this right, from the breathing sounds that play almost constantly through the game to the 13 different ambient tracks that play based on which area you’re in.

On the subject of audio, I do love the soundtrack that my partner Amy (who also voiced the protagonist) and I created for the game. I started the collaborative process with a video of a full playthrough, from which I created a spreadsheet of all of the areas of the game that I felt needed music, and the general feeling I wanted each piece to have. I then talked her through each of them and showed her the footage of the respective gameplay, based on which she wrote and recorded piano pieces. I then built on the piano, sometimes minimally by just underscoring it with some background synths, but sometimes adding drums, bass and lead synths to make a more structured song. I think this variation helps certain tracks to stand out, as they feel unexpected, and these tend to be the ones that players comment on most often.

I’m also happy with how the narrative came out. Considering I didn’t have an ending to the story in mind when I made the original Game Jam version of the game, I like what I came up with, and people have generally reacted to it in ways that I’d hoped they would. That said, it does feel like the most contentious part of the game, if the negative reviews on Steam are to be believed. I don’t know that there’s a lot I can say about this, as I find it a lot easier to pick apart what does and doesn’t work in game design than I do in storytelling, but I think the fact that it has a fairly ambiguous ending might have something to do with it. Also, without spoiling too much, the unlockable post-game content continues the story in a way that addresses a lot of the criticism that I’ve seen in the negative reviews, but again I can’t really say, “You’re wrong about this!” because I made the conscious decision to gate the majority of players from seeing it.

Also, while the aforementioned rooftop section can be a little slow in its pacing and perhaps doesn’t make the best use of its mechanics, I think I did a good job of structuring it in a way that helps the player understand where they need to be going, and what they need to do. I’ve noticed that players tend to struggle with navigating some of the areas, and keeping track of where they’ve been already. Without the ability to move the camera around freely, this is understandable; it’s then up to me as the designer to control what the player sees in such a way as to make sure they don’t miss important things.

Facing Outwards vs Facing Inwards

One of the three main walls in the Storage room, showing three routes the player can take.

One area that players struggle with is the Storage Room; this has been the case since the very first version I released, and in spite of everything I’ve done since then to highlight the structure of the room and make it clear where the important doors and switches are, more than half of players still take the wrong route at some point. All I can really put this down to is the fact that the camera is in the middle of the room, facing the outer walls, so you’re generally only seeing one wall at a time, and it’s easy to forget how each wall links to the one next to it. At any rate, going the wrong way for a few seconds isn’t a major issue, and in general I’m happy with this puzzle.

Two spots in the Rooftop section where blocks that you might have missed are highlighted.

By contrast, the Rooftop section is similarly square/circular in its structure, but this time the camera is outside pointing towards the centre. This means the player sees both where they’re going, and where they’ve come from, so the relationship between the two is much clearer. This does break down a little when moving between the three different levels of the puzzle, but generally this isn’t a big problem; most players will instinctively make their way to the top, and once they’re up there they get a better sense of what’s on the lower levels, thanks to how the camera is angled down. The area is structured with an elevator that takes the player to a locked door on the bottom level, a puzzle with one of the blocks they need on the middle level, and two more blocks on the top level. If they go straight to the top level, the process of bringing either of the two blocks on that level to where they need to be will point the camera at the block on the level below, which they missed. I’m happy with how this came together, and from watching people playing the game, I feel like it’s working fairly consistently to reduce frustration here.

A lot of how I managed to get to this point was playtesting, something I wish I’d done a bit more of. Once I’d got the layout of the entire game in order and rough ideas of what the puzzles would be (about a year into development, and a year from release) I carried out a playtest with 10 people to get an idea of how the mechanics were being understood, and where the sticking points in progression and the puzzles were. A lot of what came out of this were tweaks to the camera in specific areas to highlight where the player needs to go, but also making sure that things of importance were being lit correctly.

I think this post is already long enough, so I’m going to wrap it up here. The next part will deal with putting the game on Steam, marketing, the reception, and how it sold (spoilers: not great). See you then!

The Sirena Expedition Jam version, Postmortem Part 2 - Underwater Happenings

Hello! It’s been a while since my last post; I was hoping to finish a post mortem of The Sirena Expedition fairly quickly, but some life stuff came up and my schedule’s been a bit all over the place. Hoping to have it all sorted out soon, so I can go back to working on the full version of the game in earnest. In the meantime here’s part 2 of the post mortem!

In part 1 of the post mortem, I wrote about how I made The Sirena Expedition look (a bit) like a PS1 game, and how I designed the facility. Today I’d like to look at how I made the game look and sound like it’s underwater, and the kinds of events that I made use of.

There are two post-process effects that I used, on top of the PS1 dithering effect. The first is a basic depth-based fog effect:

This also serves to limit the draw distance on exterior shots; I’ll be honest though, I wanted this to be a bit more pronounced than it is. I set up the distance so that it was possible to see some of the seabed in the background of a shot looking out of a window, but this meant that the effect isn’t really noticeable on interior shots. My plan was to create a way of controlling the fog depth in different areas, but I didn’t get around to doing this before the jam deadline. It’s on my list of things to implement in the full version of the game.

The other post-process effect I used adds a slight waviness to the screen, and looks like this:

This is quite a straightforward effect; I did try out something a little more complicated, but it ended up looking a bit too erratic; it would probably look okay for a first-person game, but it felt like it would interfere with the platforming (simple though it is) in a game like mine. What this looks like (in a slightly early version of the game, is this:

Something else you can see in this video are the particle effects that I used; these are fairly simple, but make a great deal of difference when paired with the post-process effects. The first one consists of atmospheric particles that appear at random within a specified box, drift about slightly and fade out. I then set up boxes for the particles in each of the rooms in the game, and in the exterior areas as well, and controlled the density of the particles based on the size of the area. The second particle effect spawns bubbles from a central point, which drift upwards for 10-15 seconds before disappearing. I placed these in key locations (in the larger rooms, and at several points outside the facility); you can see them in the centre of the spiral stairwell in the video above. I also used similar particles for the aquanaut’s breathing, and for the trail of bubbles behind the bathysphere at the beginning of the game.

The last part of making the player feel like they’re underwater is the audio. The ambient soundtrack is split into four 1-minute sections, which play on a loop based on where in the game you are. As you progress into the facility, the ambience becomes heavier and more oppressive as more sounds are layered on; it is comprised of multiple different elements, but the main one is a loop of underwater bubbles. You can see the basic layout here:

On top of the bubbles, in the second section I add a simple pink noise with a filter sweep, and the hum of machinery, quiet at first, but louder by the fourth section. I also add the sound of straining metal (created by slowing down creaking sounds from metal gates) and clanking metal, all with heavy reverb; these also increase in frequency and intensity in sections three and four. In section three a machinery pulsing sound is added, which intensifies in section four. Then, in all sections I added glitchy electronic sounds that were created by speeding up various songs and ambient tracks many times, so that each is only a couple of seconds long. You can hear the results here:

In my previous post I mentioned using box volumes to switch the player from one spline path to another, and to change the camera settings; I made use of these for a lot of the features in the game. I also used volumes to play specific audio, be that a section of the ambient soundtrack, music, or one of the pieces of recorded dialogue that play throughout the game. They are also used to control the player’s walk/run speed (which was a feature I implemented initially to force the player to walk in one section of the game, but ended up using it to control the player’s speed so that it wasn’t possible to make audio overlap. I’m not happy about having an inconsistent movement speed, really, so this is something I want to fix in the full game), and to trigger tutorials.

Finally, I used volumes to fire the various scary events that happen in the game; a generic ‘event’ class contains functions for triggering and resetting the event, and I was then able to create child classes with specific behaviour for each event. Without wanting to spoil anything, some of these involve playing an animation, some move an object from one location to another, and some teleport the player to a new location.

That’s everything for today! In the final part of the post mortem, I’ll take a look at the game’s story/voiceover, and talk about some of my plans for the final game. Thanks for reading!

The Sirena Expedition Jam version, Postmortem Part 1 - Emulating the PlayStation, and Level Design

Hello, it’s been a while! My intention was to update a dev diary for my Haunted PS1 jam game every couple of weeks or so, but in the end I struggled to find the time, and it was all I could do to get the game finished before the deadline. Now that I’m finished (and have spent a week working on a patch to fix a few issues and add a few things that didn’t make it into the original build), I figured I’d write up a bit of a post mortem talking about the process of making the game.

Given that in my previous post I had just finished prototyping the spline-based 2.5D movement and camera, I’ll pick up from there. The next thing I did was make it so that you can move between two different splines. This was actually a little underused in the final game (which ended up being fairly linear), but it allowed me to have branching paths.

In this video you can see the initial path the player is on; the first box they pass through is for switching to the spline they are already on, so this does nothing, but the second box switches them to the upper path, which allows them to move around the corner, rather than going straight. Something else you’ll notice from the video is that it looks a bit more like a PS1 game than it did before. This is due to a post processing filter that emulates the dithering algorithm used by the PlayStation. Alas, I don’t have the technical skill to have made this myself, but it is thanks to a Twitter thread by Jazz Mickle. Another material I used comes from this thread by Lilith, the developer of BloodbornePSX, and emulates the PlayStation’s affine texture mapping and vertex snapping.

On the subject of the PS1 look, I took a few liberties with it, so I wanted to talk a little about my reasoning for doing so. The poly-count and texture size are fairly accurate; I kept the character to around 700 triangles, the walkways are generally about 30 polys apiece (I used masked textures for the railings and mesh), and there are never more than 100 in a single room, so we’re looking at a maximum of 3,000 triangles. The rooms are a slightly different story. Initially I made them as cube where each wall was divided into two triangles, but because of the way the affine texture mapping works, this caused some major distortion in the way the textures were displayed. As a result, I subdivided the walls into (generally) 8x8 squares, so that each triangle took up less screen space, and therefore suffered from less texture warping. As a result, the polycount for the rooms is generally at around 900 triangles. However, combined with the player and all of the walkways and other objects, I’m fairly confident there are never more than 10,000 triangles on screen at a time, which is the PlayStation’s limit. The textures are also all either 32x32, 64x64 or 128x128 pixels, which is consistent with most PlayStation games I’ve looked at. The result of this is below:

Where I’ve been less authentic is the lighting. I did initially look into ways of doing vertex-based lighting (as opposed to Unreal Engine 4’s lighting, which is calculated per-pixel), but this was hard to do, and after spending a day on it I couldn’t really get it to work right, so I gave up. I also considered having everything be unlit, but it would have been a lot harder to achieve the kind of atmosphere I was going for. In the end, UE4’s lighting was the nicest solution, and the easiest to do quickly, so I took an authenticity hit in the service of getting a look I was happy with. It’s also worth noting that because I didn’t have to worry about memory constraints, I was able to load the entire facility in and have you go seamlessly from a title screen into the game and all the way to the end without having to load or unload anything, but this would definitely not have been possible on original PlayStation hardware. In general, though, I think the game still evokes the look of a PS1 game, which is what I was going for.

So, to go back to the development process, after getting the basic movement mechanics working, I started building the facility using UE4’s BSP (Binary Space Partition tools). This let me play around with the layout and basic level design without committing to modelling anything before I knew how it all fitted together. This is what I ended up with:

As you can see here, I’ve decided on the number of rooms that I felt comfortable with modelling in the time allotted for the jam, and set up walkways for the player to move around on. As I was doing this I was setting up splines, so it was possible to move from the start of the level to the end of the level. I also implemented some basic puzzles as I went along, which meant building a few more mechanics: switches that can be interacted with, doors that open when the relevant switch is pulled, and camera transitions for showing which door opened (I could probably have left this until a bit later, but I wanted to get a feel for how obvious it would be which door you’d just opened).

When I was happy with the flow from start to finish, and was happy that I wouldn’t need to change too much going forward, I exported my BSP mesh as an FBX file and imported it into Blender. I was then able to take the individual rooms and walkway pieces, clean up the meshes, UV-map and texture them, set up collision and bring them back into the game with minimal fuss. In all I think it took me about two weeks to do all of this; I hadn’t done a lot of environment modelling before, so I was probably a little inefficient in places, and texturing is still not something I’m great at. Here’s how the facility ended up looking, with the exterior mesh and without it:

A couple of notes here: the black areas around the three hallways are there so that you can’t see through the back faces of the rest of the level geometry; this seemed like the most elegant way of handling transitions from outside to inside, so it blacks out the top and bottom of the screen. When you then move into the larger rooms I don’t have to worry about the camera passing through the walls, because I can move it into positions where this doesn’t happen, which isn’t possible in the narrower spaces. Also, the reason why the walkways and pipes look more and more lumpy as they get further away is due to the vertex snapping that I mentioned before. I probably could have turned this off before I took this screenshot, but it didn’t seem like that big of a deal!

That’s all for now; in the next post I’ll look at how I got the game to look and feel like it’s underwater, with particle effects and sound effects, and how I set up the various events that happen throughout the game. Thanks for reading!

Haunted PS1 Summer of Shivers Jam, Dev Diary #1

A couple of weeks back I decided I fancied a change of pace; the Haunted PS1 Demo Disc is something that I’ve been aware of before, and when I saw that they were having a summer game jam, I figured this could be an interesting project to work on for a month and a bit. I haven’t made anything in UE4 for a while, and I’ve been playing a lot of PlayStation 1 games over the past couple of years, so I really liked the idea of recreating that aesthetic.

I don’t want to reveal too much about my plans for the game just yet, but I’m going with the theme ‘Submechanophobia’ (the fear of submerged human-made objects), and the game is going to be a 2.5D platformer in the style of Pandemonium or Klonoa. First thing I did was model and animate the main character; it was fun to make something so low-polygon, with crunchy low-resolution textures:

Aquanaut1.gif

I obviously have a lot more modelling to do, but the next thing I wanted to get done was to get the character moving around in UE4. I always sort of wonder if writing my own movement code is the most efficient way of doing things, but I sort of hate UE4’s default character pawn, and find that it doesn’t make it easy enough to control the specifics of the movement. And given what I planned to do with splines, it was probably going to be easier overall. The following video demonstrates this:

Basically I created spline objects that can be placed in the level, and whenever the character moves left or right, instead of updating their world position, I update their distance along the spline, and then use that to determine their location and orientation in the level. I only use it to set their X and Y position, however; this means that their vertical position is independent from the height of the spline, so they can jump around and move along platforms in the air.

The most recent thing I implemented, which is also shown in this video, are camera transitions. I did this by creating objects in the level that have a collision volume attached to them, and each one has editable values that control the camera’s Field of View, rotation and distance from the character. When the player touches one of these volumes, the new values get passed to them, and the camera transitions to them over a specified length of time. It works nicely!

That’s all for this update; next thing I want to do is set up functionality for moving from one spline to another, so that there can be a branching path that takes you away from the main spline, and then start planning out the design of the level and start modelling the environment.

Project Clockwork Dev Diary # 2

Hello! I’ve been making some decent progress on the level editor. In my last update, I’d just finished fighting with the code to pull information from the level data and display it in the editor panel. Having done that, making changes to that information was relatively trivial (although I did have to make a few more changes to the way the editor categories are stored). I implemented controls for increasing and decreasing values, and once that was working the changes you made were automatically reflected in the level, which felt really rewarding! Here’s a video:

After getting value editing working, I made a few more changes. First, I implemented functionality for moving the camera to a specific location. This will eventually be useful in the game (for highlighting a door that you’ve opened, for example), but in the editor it is used for centring the object you’re making changes to. To do this, I needed to make a system that takes an item from the editor, and returns a set of coordinates for the object that it’s associated with. For gears this would be the centre point of the gear, but for geometry vertices it would be the coordinates of the vertex itself, and so on.

Next I got buttons working. I forgot to demonstrate this in the video, but these are generally used for adding new elements; sections, gears, walls, that kind of thing. Then I needed a way of highlighting objects that you’re editing. I was mostly able to adapt the previous code for getting the location of an object, and use that to tell the code that draws all of the level objects to flash the currently selected object. It also draws a crosshair over whatever is most relevant to the item you currently have selected.

So, I think I’m finished with these systems for the time being. There are a few things that I need to work on next: A context menu that can be used for copy/pasting, deleting items, and undo; a secondary editor mode where you can move a pointer around the level directly, and select and move objects directly (this is going to be a big job); a system for determining a better location for newly-created objects (currently these get spawned at (0, 0), but this can often be quite far away from where you want them to be).

See you next time!

Project Clockwork Dev Diary #1

Hello! First things first, this is my first entry for quite some time. I’m going to be writing about my development process here going forward, as I have recently started working on a project full-time. I’m a bit late in announcing this here, as I wanted to at least have something concrete to post, and what I ended up working on was something that’s not particularly exciting to look at. I will post a few GIFs of things I’ve done previously that are a bit more interesting, however!

Here is some prototyping I’ve done on what will eventually be a playable game:

Gears13.gif

Without wanting to give too much away this early on, I’m making a platformer where the levels are filled with gears and clockwork mechanisms. I’m creating it in a 2D engine, but as you can see above I’ve faked a 3D effect; there’s a reason for doing this that I hope will eventually be apparent!

One side-effect of this, however, is that there is a lot of data that goes into building the levels: they’re constructed from ‘sections’ which can be fully articulated, and each section has geometry data for all of the background layers (which are used to create the illusion of 3D), and each of the gears has a lot of data describing it. So far I’ve been entering all of this by hand, but it’s time consuming and fiddly.

As such, since working on the game full-time I’ve started making a level editor. Because of the nature of the platform I’m making the game for, it made most sense for me to build this within the game itself (otherwise I’d have to maintain two separate codebases in two separate SDKs whenever I add new level features, and I don’t really want to do that). There was a certain amount of UI design required to to fit a level editor within some fairly strict constraints, and once I did that I could start implementing it. Here’s a video showing where I’m at so far:

The panels on the right were fairly easy to implement; first thing I did was create data structures for containing each of the items that would appear in each panel, based on what needs to be editable for each feature of the level. I made them scroll up and down, and slide in and out when you move between menus. This is a little glitchy in places, and I may eventually fix it, but I wanted to focus on the functional stuff first. In general though, this was the easy part.

What was less easy was linking the items that were displayed in the editor with the level data. I spent quite a lot of time trying to figure out how to build a system that is able to take a list of menu items, and then look at the level data and determine how many of those it needs to display on screen, and also pull the existing value and display that. I think it might be just that I don’t have a lot of experience with building tools like this, so cross-referencing data structures is an unfamiliar area for me. The basics of it are working now, though, and hopefully the next steps will be a little more straightforward.

Speaking of which, my next plans are to implement the ability to change values (which, now that I’ve solved the problem of reading the data in the first place, should be fairly trivial), allow the saving out of edited level data, and eventually build controls for moving around the level. More on that: Soon!

Business Guys on Planes

I'm a little late with this post (And still annoyed that I never bothered posting about my previous Wizard Jam game, Dot Gobbler), but here's a game I made for Wizard Jam 4:

Download Business Guys on Planes on itch.io!

It's pretty unfinished at the moment; I missed the jam deadline because I was out of the country for the last five days of it, and I failed to upload a build before I left. What's there at the moment is largely the result of a week or so of cramming when I got back, and there's still a lot of stuff I didn't get in. I just figured I should get something up, so I got the essentials in there and pushed it out.

I'll be working on adding more to it over the next couple of weeks, in time for Idle Thumbs streaming all of this Wizard Jam's games towards the end of January, so hopefully I'll post again about what I added, and about the general process of making the game.

Childhood Game Design - Part 4

Foreword: I've been sitting on this post for a while, largely because the sheer number of games I had to describe was daunting. I started it back in November, and only finished it now, 6 months later. I think the fact that all of the games are made from either ASCII characters or ZX81 characters was also a factor, as they're all generally a bit less appealing, visually. However, I've finished it now, and as such I'm done with all of the drawings that I've been able to find. I know for a fact that there are a few that I'm missing; if I ever find them at any point, I'll scan them and post them here.

When I was around 10 or 11, a friend of mine had a VTech Precomputer 1000. I don't think I ever used it at the time, but I knew that it had a simple ASCII display, and a BASIC programming language interpreter built-in, so I jumped to the logical conclusion that you could program games for it. I went on to imagine a large number of games where the graphics were made entirely from ASCII characters. I think I was peripherally aware that the Precomputer 1000 only had a single line display, so none of my games were viable, but I didn't let that dissuade me too much. Most of these drawings will be from 1990-1992.

Some years later, I acquired a Sinclair ZX81 emulator for the Atari ST, and was kind of taken with the fact that the machine had no capacity for sprites, meaning that everything in its games was rendered either using ASCII characters or a number of special characters, which took the form of black and grey squares mostly. This reignited my strange penchant for drawing games within extreme graphical limitations, so at some point my ASCII games changed to include the ZX81 character set also. At some point I stopped drawing games in any other format, for reasons that aren't exactly clear to me, but as a result all of the latest games I drew are ASCII or ZX81 games. These probably ran from around 1993 to 1995.

Nineties Cockpit Freakout is at EGX Rezzed!

It never occurred to me to write a blog post about this fact until I was standing in front of a machine with my game on it and a poster above it:

It's been an interesting month! I originally made Nineties Cockpit Freakout for a game jam last year, mostly as a way of teaching myself 3D modelling, and to make games in UE4. I had no idea what I was doing, and it shows! I had ideas about the kind of controls I wanted in the cockpit, but for a lot of them I had no idea how I was going to make them, and I ran out of time before the jam deadline. Earlier this year, however, David Hayward put out a call for submissions to the Leftfield Collection that he was curating for Rezzed, so I figured I may as well submit it, on the proviso that I would actually go back and finish the game off, using skills that I'd accrued from a year of working in UE4 as half of TriCat Games.

The game was accepted, so that's what I did! I'm really proud of what I've managed to achieve in that time, and in terms of how the game looks and plays, it's way closer to my original vision than the version I submitted to Wizard Jam was. You can download the Rezzed build (Along with the old jam build, if you want to see how far it's come along) from my itch.io page:

https://giraffecat.itch.io/nineties-cockpit-freakout

So it's been really interesting watching so many people play the stupid thing, considering that I'd seen at most three people play it before that. When Rezzed finishes I want to write a post about what I've learned from it, and what I'd like to do about that. There was a load of stuff that I didn't get done in time for the show (A running theme with me), so I'm hoping to finish it off and upload a final (final) build! Look forward to that.

Childhood Game Design - Part 3

As well as finding a large collection of games that I'd drawn, I also found a number of drawings of games by a few other people. The majority of them were made by my sister, and it's interesting to see how her perspective differs from mine, as someone who had less exposure to the kind of games I played. Certainly none of them involve shooting or spaceships. There's another page of drawings that I think is mostly by me, but which also features a drawing by Maria, the daughter of a friend of the family who was several years younger than me. I don't think the drawing was meant to represent a game, but I feel like I added to it in order to make it look like one. My memory is really fuzzy on this, though.

Finally, there are three drawings by a boy I went to school with by the name of Andrew. I'm not sure of the circumstances which lead to him drawing them and giving them to me, but I know he hadn't really played any video games. Perhaps I approached him and asked if he played games, or maybe he'd heard me talking to someone else. At any rate, his drawings show a much better grasp of perspective than mine, and I was always impressed by them.

Click on the images to enlarge them, as usual!

Childhood Game Design - Part 2

As well as drawing made-up games as a child, I also drew a lot of toys and action figures that I'd invented. Usually they were new ideas for existing ranges of toys, like Transformers or M.A.S.K., but occasionally I'd make up my own line of figures. These included Catomeets (humanoid cats that each came with a building or a piece of scenery so you could build a whole town), Seaons (humanoid sea creatures with weapons) and Mosstors (seemingly just moss-textured action figures). I have a vivid recollection of telling my dad that I wanted to be an inventor of toys when I grew up, and him saying something along the lines of, "I don't think that's a real job. You should be a scientist instead." My response to this was, "Okay, I'll be a scientist."

Anyway, in addition to the toy lines, I also invented a new computer for Atari, called the Atari 770XAX, which is where I'm going to pick up in this post. All of these drawings are still pretty early, and there's probably some crossover between this and the previous post, because the chronology isn't completely clear in my head, but I think in general they were drawn slightly later. Say, 1989-1990. As before, click on the images to enlarge them!

Childhood Game Design - Part 1

I was obsessed with video games from a very early age. From the time I first played Spiderman on an Atari 2600, or spent several days coaxing a handful of Dragon 32 cassettes to load on the machine that my dad had borrowed from a workmate (I can't quite remember which came first), what fascinated me about the medium was its potential to deliver wildly varied experiences. I would pore over magazines and game catalogues, looking at screenshots and cover art and wondering what those games would be like. I also also used to draw a lot, in school notebooks and on whatever pieces of paper I could get my hands on, so naturally I ended up drawing games that I'd made up. On a recent trip home, I dug around in my mum's attic for as many of these drawings as I could find, with the intention of posting them and describing them to the best of my memory.

I found a large number of drawings, so I'm going to have to spread them across multiple posts. In this one I'm going to focus on what I assume are some of the earliest drawings, dating back to about 1988, when I would have been 7-8. Click on the drawings to view them at full size!